So after careful thought and not wanting to cosplay a batman villain like all my other friends i have come to the conclusion that constructing NCR Rangers armor would be much more interesting and fun in the long run.

The Helmet

i'm using a pep file to get the helmet to the right shape before i jump in and make it out of plastic for the final copy. I want the helmet to resemble something like this build. The build is by Kommissar and you can check out his entire project here http://www.therpf.com/f24/fallout-new-vegas-ncr-veteran-ranger-finished-101257/.
I would like to make it as close to game standard as possible and hopefully that's how it will turn out.
Armor, Duster and all the other stuff.
The armor is going to made from EVA foam, as it won't melt when spray painted and also is quite easy to add battle damage to via a soldering iron. The duster is looking to be quite difficult to find though, so i may have to ask my nan the resident clothing creator to help me out in that department. The arm bracers/gauntlets/armor what ever you want to call it will be made from the EVA foam as well. other than that all that is needed is a few little bits and bobs like the rangers sling across the chest for the gun to hang on his back, and the ammo belt which i can probably buy from a toy shop.The Gun
It has to be the AER9 it just sits so well with the armor, and seen as finding a ranger sequoia may be slightly difficult, and making one would just be to boring I've gone and found myself some blue prints of the AER9.
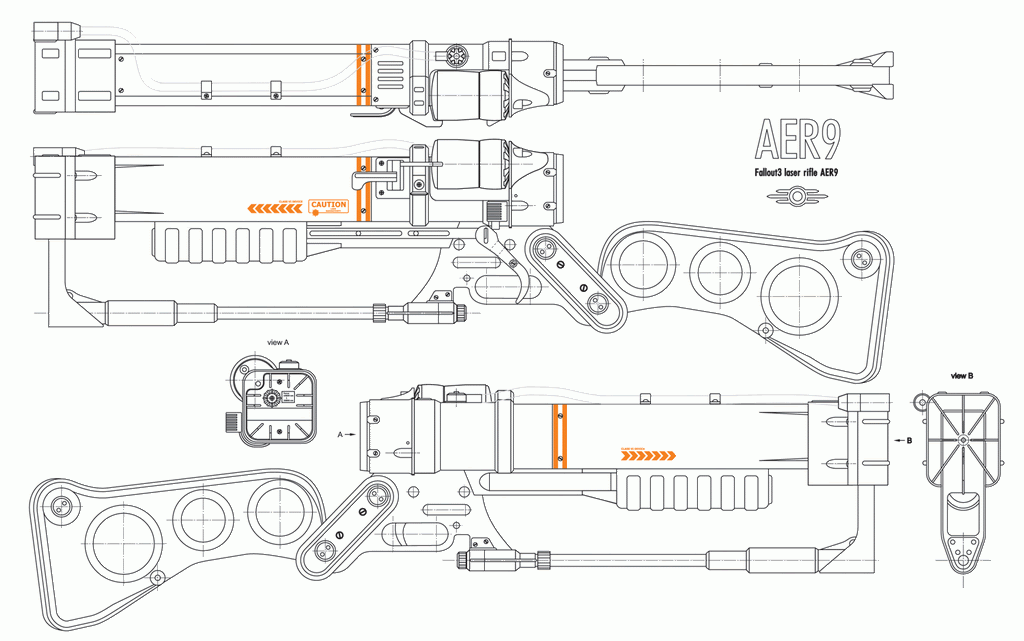
The blue prints are quite easy to follow, this is mainly just a wish, hopefully i should be able to produce something that looks a lot like one otherwise its off to Mr Toys to buy a cowboy pistol and then buy some gold paint and paint some plants onto the toy gun to make a cheap Sequoia. The AER9 is going to be made mostly out of thin mdf (possibly) and some steel in areas where possible.
Progress So Far
so after printing out 31 pages of pep file, and spending about 5 hours cutting out the pieces with scissors cause i could not for the life of me find my Stanley knife i began construction of the helmet, the actual helmet part is pointless to me, its just there for good measure and to see if i have to scale it back. I'm planing on buying a steel helmet for the final build as it would just add that bit of realism to the whole Helmet/mask piece.


Tried to build the canister as well to see how that would go. Paper Hates Being Cylindrical, it kinda stuck together but it just kept falling apart. i will have to keep that in mind for when i make the final copy, possibly making it from a metal tin cut so the bottom slips inside the top could be easier.
quite happy with the progress, going to start building the chest armor on the weekend hopefully, but that really will only happen if school isn't killing me. If anyone has a look at the blog and takes the time to read it well your a nice person and ill try and update again as soon as i can.
Jaisus Signing off
No comments:
Post a Comment